

Mac App Controller for MFC Deck
Create a control panel for sending commands to macOS applications.
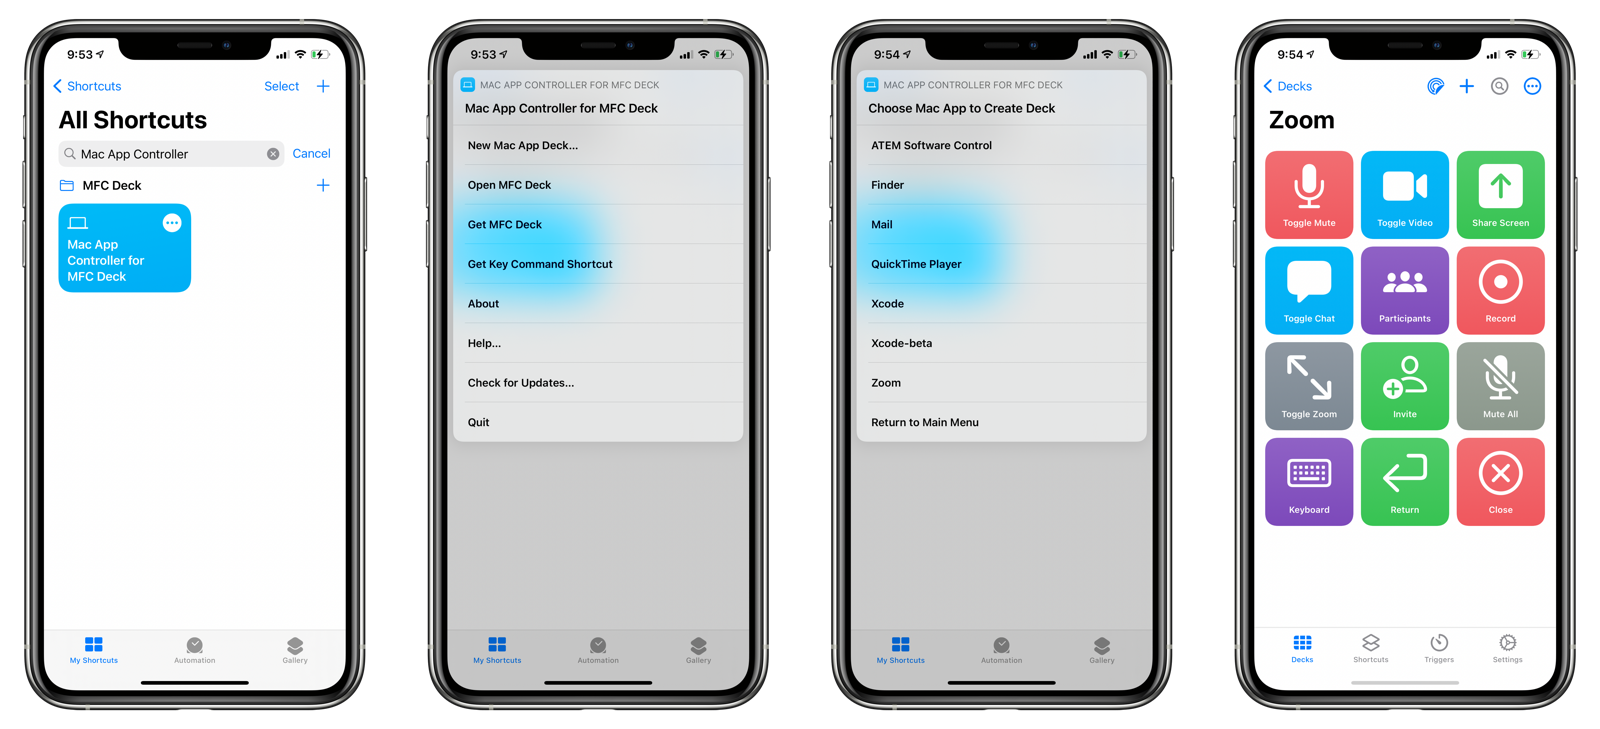
Table of Contents
- System Requirements
- Setup
- Using a Mac App Deck
- Controlling Additional Applications
- Command Format
- Speeding Things With Keyboard Maestro
- Troubleshooting
System Requirements
You need the following shortcuts and applications to use Weather Deck Generator:
- Mac App Controller shortcut
- MFC Deck Key Command shortcut
- MFC Deck
Setup
After you have installed the two shortcuts and the MFC Deck application, do the following:
- Open Shortcuts.
- Duplicate the MFC Deck Key Command shortcut.
- Set the name of duplicated shortcut to something that references the computer you wish to control (i.e.
Key Command: COMPUTERNAME). - Edit the shortcut.
- In the
Authenticationdictionary, enter the hostname and the credentials (username and password) for the computer you wish to control. - Tap Done.
IMPORTANT SECURITY NOTE: The password in the credentials dictionary is stored in cleartext within the shortcut. Do not distribute the shortcut to others, or they may gain access to your computer.
- Edit the Mac App Controller for MFC Deck shortcut.
- In the
Key Command Shortcuttext variable, enter the name of the shortcut you created in the previous section (e.g.Key Command: COMPUTERNAME). - Run the shortcut.
- Tap New Mac App Deck.
- Choose the application you wish to create a deck for in MFC Deck.
- Enter a name for the deck and tap Done.
- The shortcut will now create the deck and cards.
- Tap
Open DECKNAMEto open the deck in MFC Deck or tap Return to Main Menu to create another deck.
Using a Mac App Deck
Once you have created your decks to control your macOS applications, do the following:
- Open MFC Deck.
- Open the deck for the macOS application you want to control.
- Tap on a card.
MFC Deck will launch Shortcuts and send the command to the MFC Deck Key Command shortcut you duplicated during the setup process.
An SSH connection will be opened between your iOS device and your Mac. If successful, an AppleScript command will then be sent to the application specified in the card.
NOTE: The roundtrip from MFC Deck to Shortcuts to your Mac can take a second or two to complete. If you want a faster means to send commands to your Mac, look at using Keyboard Maestro.
Controlling Additional Applications
You can add additional applications to control by editing the Apps dictionary within the Mac App Controller for MFC Deck shortcut.
At the top level is a list of dictionary objects that refer to the application being controlled.
Dictionary Format
- Name: The name of the deck to create.
- Icon: The icon of the deck. Specify a valid SF Symbol.
- Color: The color of the deck. Choose from Red, Vermillion, Apricot, Pollen, Mint, Turquoise, Light Blue, Cerulean, Delft Blue, Violet, Lilac, Pink, Fog, Limestone, and Sand.
- Cards: An array of dictionary objects with the following fields:
- Name: The name of the card.
- Command: The command to send to the remote macOS computer. The command follows the Command Format specified below.
- Icon: The icon of the card.
- Color: The color of the card.
- App: The macOS application to control. Leave blank to send the key command to the frontmost application.
Command Format
The command format is a text string that tells the MFC Deck Key Command shortcut which command to send to the remote macOS computer. Examples include:
Command ACommand Shift ACommand Option Control AShift Areturndownarrowinput
Do not add any dashes or hyphens between the keyboard modifier strings.
Input
If the string input is sent, a menu will appear allowing you to enter arbitrary text to the macOS application, as well as sending various key codes.
See a list of all possible commands here.
Key Codes
- return
- tab
- delete
- space
- forwarddelete
- linefeed
- escape
- uparrow
- downarrow
- leftarrow
- rightarrow
- insert
- home
- end
- pageup
- pagedown
- f1
- f2
- f3
- f4
- f5
- f6
- f7
- f8
- f9
- f10
- f11
- f12
- f13
- f14
- f15
- f16
- f17
- f18
- f19
- f20
Example
Here is a sample from the Zoom deck.
{
	"Zoom": {
		"Name": "Zoom",
		"Icon": "video.fill",
		"Color": "Violet",
		"Cards": [
			{
				"Name": "Close",
				"Command": "Command W",
				"Icon": "xmark.circle",
				"Color": "Red",
				"App": "zoom.us"
			},
			{
				"Name": "Mute All",
				"Command": "Command Control M",
				"Icon": "mic.slash.fill",
				"Color": "Limestone",
				"App": "zoom.us"
			},
			{
				"Name": "Toggle Zoom",
				"Command": "Command Shift F",
				"Icon": "arrow.up.left.and.arrow.down.right",
				"Color": "Fog",
				"App": "zoom.us"
			},
			{
				"Name": "Share Screen",
				"Command": "Command Shift S",
				"Icon": "arrow.up.square.fill",
				"Color": "Mint",
				"App": "zoom.us"
			},
			{
				"Name": "Record",
				"Command": "Command Shift R",
				"Icon": "smallcircle.fill.circle",
				"Color": "Red",
				"App": "zoom.us"
			},
			{
				"Name": "Participants",
				"Command": "Command U",
				"Icon": "person.3.fill",
				"Color": "Violet",
				"App": "zoom.us"
			},
			{
				"Name": "Toggle Chat",
				"Command": "Command Shift H",
				"Icon": "bubble.left.fill",
				"Color": "Cerulean",
				"App": "zoom.us"
			},
			{
				"Name": "Invite",
				"Command": "Command I",
				"Icon": "person.badge.plus",
				"Color": "Mint",
				"App": "zoom.us"
			},
			{
				"Name": "Toggle Mute",
				"Command": "Command Shift A",
				"Icon": "mic.fill",
				"Color": "Red",
				"App": "zoom.us"
			},
			{
				"Name": "Toggle Video",
				"Command": "Command Shift V",
				"Icon": "video.fill",
				"Color": "Cerulean",
				"App": "zoom.us"
			},
			{
				"Name": "Keyboard",
				"Shortcut": "Key Command: Threshold",
				"Input": "input",
				"Icon": "keyboard",
				"Color": "Violet"
			},
			{
				"Name": "Return",
				"Shortcut": "Key Command: Threshold",
				"Input": "return",
				"Icon": "return",
				"Color": "Mint"
			}
		]
	}
}
Speeding Things With Keyboard Maestro
The roundtrip from MFC Deck to Shortcuts to your Mac can take a second or two to complete.
If you want a more immediate response between tapping a card and seeing the key command sent to the macOS application, you should consider changing your cards to communicate with Keyboard Maestro.
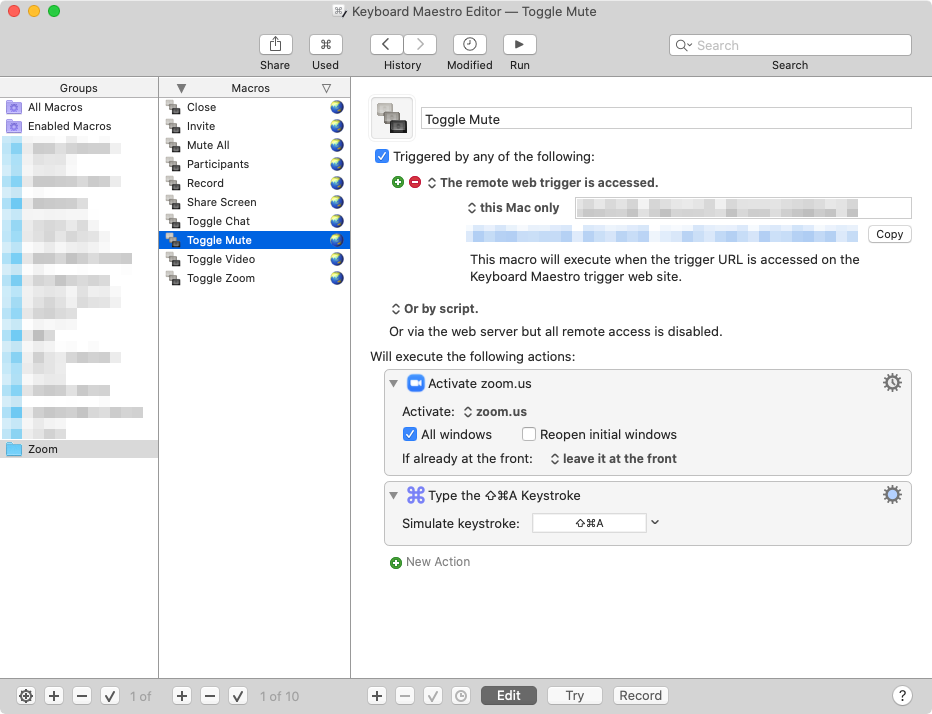
Remote Triggers
Remote triggers in Keyboard Maestro offer the fastest execution time, but you will have to create separate macros for each command that you want to send. A remote trigger provides you with a URL that you can ping to execute the macro.
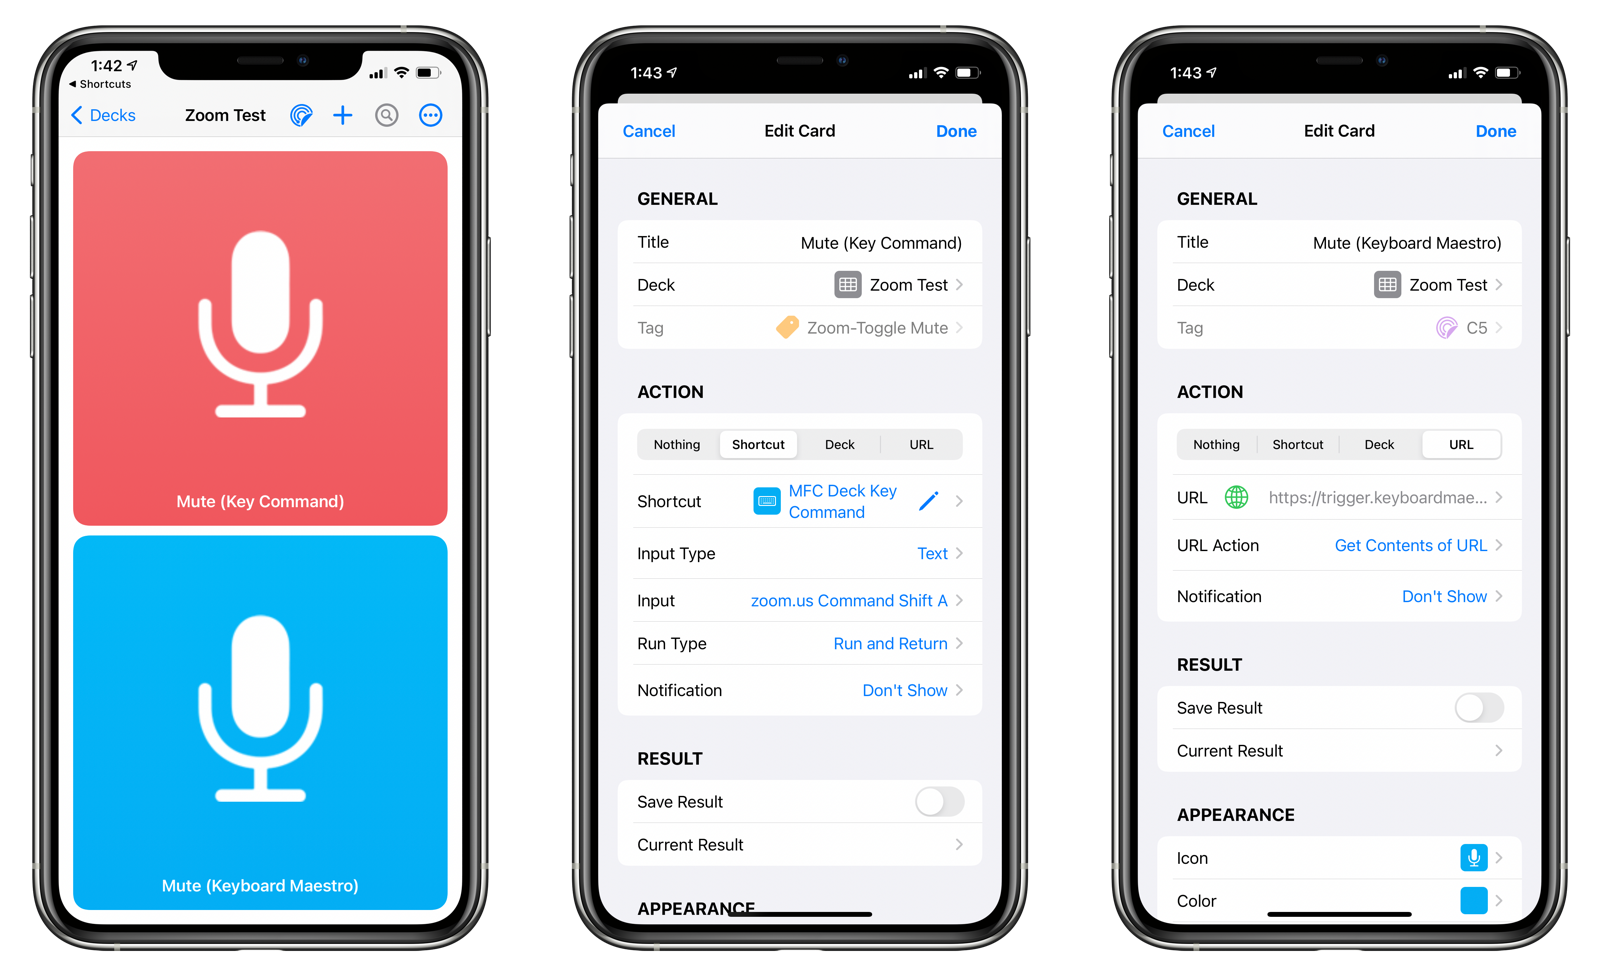
Configuring Cards to Communicate with Keyboard Maestro
Instead of creating cards that execute shortcuts, we’ll be configuring your cards to get the contents of a URL, namely the remote trigger URL from Keyboard Maestro.
- Open MFC Deck.
- Navigate to the deck containing your Mac App Controller.
- Long-press on the card you wish to edit.
- Set the action to URL.
- Choose Get Contents of URL in the URL Type field.
- Paste the URL from Keyboard Maestro’s remote trigger.
- Disable Save Result.
- Tap Done.
Now, try tapping on the card, the URL will be pinged and the action should happen pretty much instantly on your macOS computer.
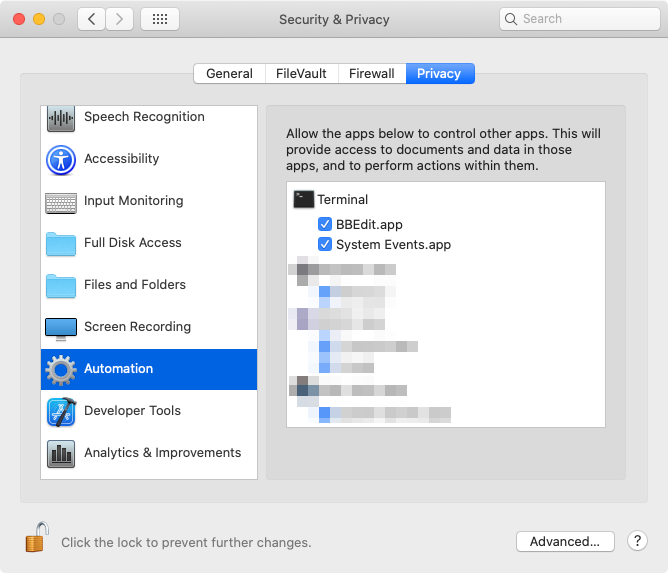
Troubleshooting
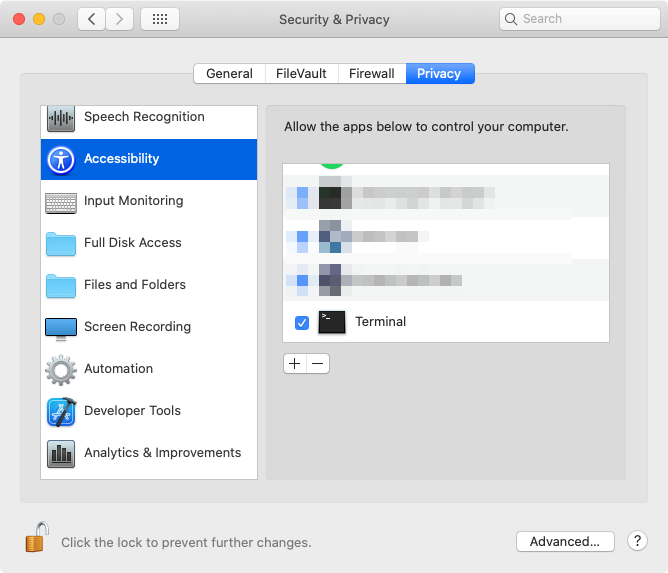
For your Mac to be controlled properly, Terminal must be an allowed app in System Preferences > Security & Privacy > Privacy > Accessibility on your Mac.
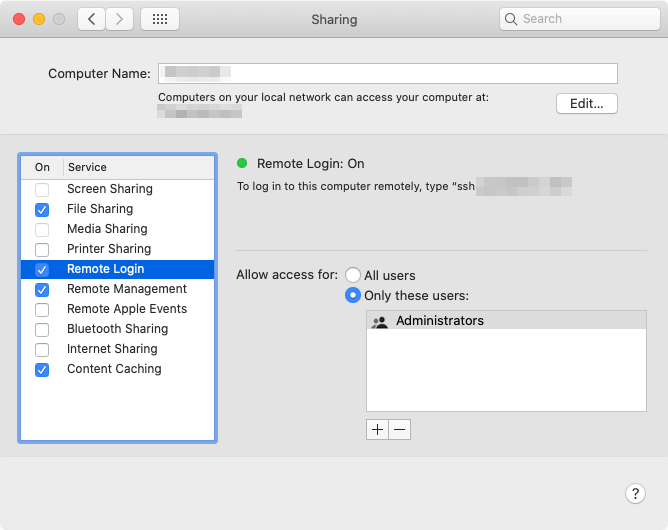
Remote Login must also be turned on in System Preferences > Sharing.
You may also need to have Terminal allow System Events in System Preferences > Security & Privacy > Privacy > Automation.